Building An Intel-Based MicroATX Gaming PC On A Budget
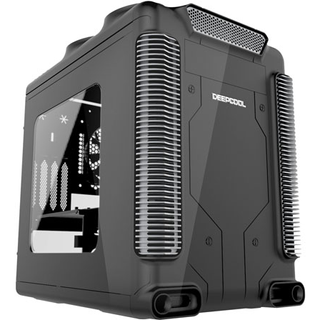
Deepcool Steam Castle
Unboxing

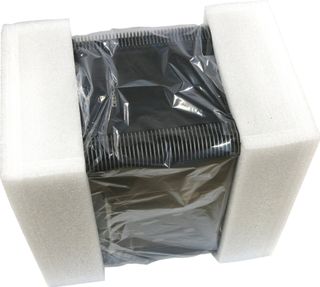
Deepcool packages its unique-looking Steam Castle in foam. You can easily grab both pieces and dump them into the recycling bin.
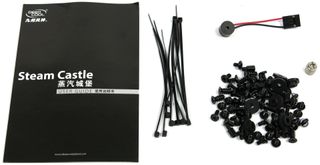
All necessary accessories are enclosed. There is an instruction booklet, screws, a tiny wrench for the motherboard stand-offs, lots of cable ties, and even a piezo speaker. The bundle covers the bases; nothing is missing.
Technical Specifications
Exterior: Look And Feel
This Deepcool case is attracting case modders who associate its shape with steampunk and fancy jukebox designs. But even if you don’t alter the enclosure, it's unique enough to stand out from the crowd and draw attention.
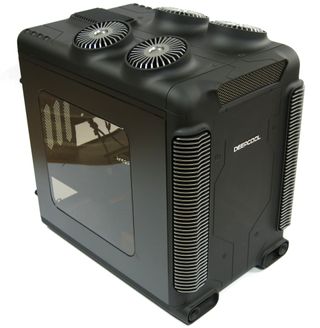
Yes, we understand that its looks are polarizing. While the German online retailer Caseking deemed the case unsellable and refused to stock it, apparent successes in other countries suggest that there's at least a market for the Steam Castle.
Let’s take a look at the exterior of the case:


The dull rubber-coated surface is homogenous and easy to work with; you can remove stains and fingerprints with a soft cloth. It looks much better than brushed or dull plastic. We suggest going with the black model. More brightly-colored alternatives may lack the dark finish's higher-end appeal.
Interior and Construction
The interior warrants a closer look as well. Deepcool went for a feature-rich cross between mid-tower and cube, and appears to have achieved its goal.
Stay on the Cutting Edge
Join the experts who read Tom's Hardware for the inside track on enthusiast PC tech news — and have for over 25 years. We'll send breaking news and in-depth reviews of CPUs, GPUs, AI, maker hardware and more straight to your inbox.
Frankly, we view the 3.5” drive bay not as a feature, but a nuisance. Most problematic is when it interferes with long, thick graphics cards, though some folks will understandably want a single high-capacity storage drive in a machine like this one.
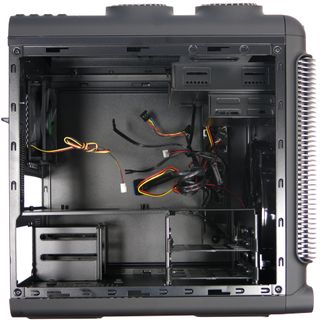
The back plate for the motherboard seems perfect, and the PSU mounting bay is at the bottom of the case, allowing your power supply to draw intake air through openings down there. A filter keeps the dust out.

Since this is a particularly wide case, a cage for two SSDs sits behind the PSU. Solid-state drives can be mounted without tools, which is something we really appreciate.


The front bezel and lid are easily removed. You need to do the former when you want to install an optical drive, though removing the lid is only necessary if you want to install two additional fans or a radiator.
For what it's worth, what appear to be four small wind turbines up top, well, aren’t.
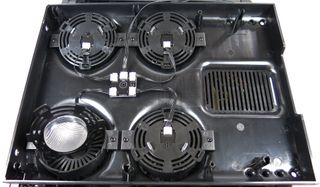
Instead of four fans, those domes house multi-color LEDs. They're purely for show. Several different light effects can be selected. There really are slots in the top though, which may help with ventilation.
Fans, Fan Control, and the Front Panel
Speaking of air, two fans comes installed in the case, and their speeds can be electronically controlled. While the rear fan is all but inaudible, the front fan is, paradoxically, quite noisy at low RPM settings and nearly quiet at full throttle.


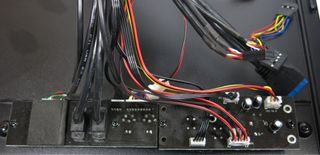
The front panel is really a side panel, which sits at the right side of the case and sports two USB 2.0 and two USB 3.0 ports, HD Audio jacks, the on/off button, a reset button, and a knob for controlling fan speed. That knob doubles as a push-button for selecting different LED effects.

The rear side of the panel is nicely laid-out. If necessary, all cables can be unplugged.
Whether or not you like the Steam Castle's looks is a matter of personal preference. But Deepcool does manage to show us something new in a well-made product.
Current page: Deepcool Steam Castle
Prev Page Building a Budget Intel-Based MicroATX Gaming Cube Next Page MSI H97M-G43 and Intel Pentium G3258-
bernie456 Anyone in their right might is not going to spend $100 on the case in a budget build, let alone one as ugly as that one.Reply -
pierrerock And this is why i would not buy a G3258 if i have to get a Z97 Board. I know H81 Boards can now overclock this CPU, but there is a lot of chances that this board would not have a bios recent enough for this CPU. and since you buy a G3258, there is little chance you have another LGA 1150 CPU in your sleeve to flash the bios.Reply
I would get a X4 760K with a better GPU instead of a G3258 with a more expensive motherboard... -
Ethan Feinhaus The only problem I have with this is that you're trying to describe a budget system with a water cooler. When one is building a budget system, there's no reason to have a water cooler when the stock cooler would function well enough.Reply -
Nestor Turizo Noob question: Isnt a stock, on air i5 for 200 usd aprox. a better option than a cheap processor + fancy cooler for 200+ usd?Reply -
pierrerock Reply14114978 said:Noob question: Isnt a stock, on air i5 for 200 usd aprox. a better option than a cheap processor + fancy cooler for 200+ usd?
Yeah a I5 would totally be better, but as for gaming, it would not push a 750 TI much more than a G3258 would. But you are right to think that a water cooling is not a good idea budget-wise -
lp231 Why isn't the total mentioned for this budget build? Also the price for the ram, aio cooler, optical drive are missing. I had to add those in by guessing the most acceptable price for those missing parts and total with what was price listed came out to almost $840. At that price, it's not a budget build. Budget build is suppose to be around $500 or less. $600 is consider a huge headroom.Reply
AIO $ 80, ODD $16 , RAM 8GB (2x4GB) $73
Most of these budget build makes no sense when there is no strict budget cap. Next time when there is another budget build and there is something that just got to have it, but cost like $100 more, let's up the price cap and still call it a budget build!
