Early Verdict
The Strix Z370-I Gaming provides excellent hardware with only the smallest of layout concerns. We recommend waiting for another firmware update that patches the Load-line Calibration bug before adding it to your shopping list.
Pros
- +
Good overclocking
- +
Dual M.2 drive slots
- +
Front-panel USB 3.1 Gen2 header
- +
Adequate number of USB ports
Cons
- -
No USB 3.1 Gen2 on I/O panel
- -
Half of I/O panel ports are USB 2.0
- -
Default Load-line Calibration causes voltage surge under heavy loads
- -
Voltage surge under heavy loads causes power throttling
Why you can trust Tom's Hardware Our expert reviewers spend hours testing and comparing products and services so you can choose the best for you. Find out more about how we test.
Features & Layout
Famed for the quality of its enthusiast-market motherboards, Asus quickly became the overclocking champion long before less expensive brands figured out what to do with things like BIOS. The company's ROG brand recognizes that legacy even as its competitors became ever more nimble. Is there any room for leadership at the top? We started small to find out.
From a motherboard design perspective, today’s gaming market means overclocking. Anyone who isn’t taking Mini-ITX overclocking seriously is living in the distant past, as the ROG Strix Z370-I Gaming will attempt to prove.
Specifications
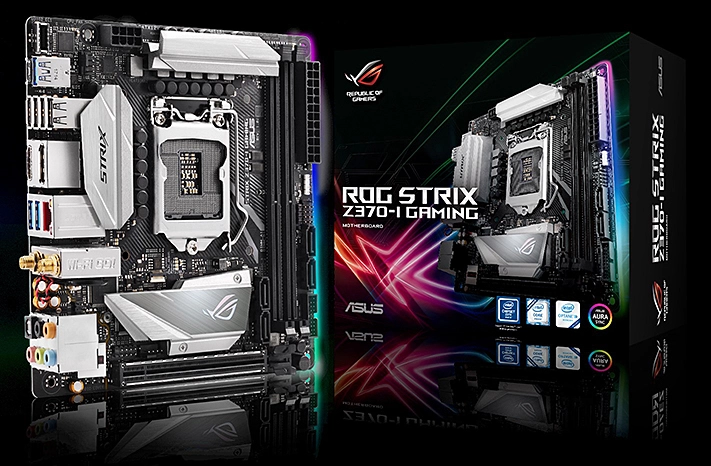
There’s so much crossover between performance enthusiasts and show systems that the RGB lighting seen in the promotional photo is almost a given, yet Asus left the standard RGB header off the Strix Z370-I Gaming. It still gets an addressable RGB LED header for WS2812B LED strips that use a single data pin (via a WS2811 driver).

I’m a demanding customer, and eight I/O panel USB ports are one of my demands. Asus meets those demands in an odd way by provisioning four USB 2.0 ports rather than the two that would have been sufficient for a keyboard and mouse, and by using only the integrated USB 3.0 controller for its “USB 3.1 Gen1” Type-C port. The Strix Z370-I Gaming has a high-bandwidth ASM3142 controller, but it's reserved for a front-panel connection. Furthermore, the light resource load of Mini-ITX causes us to question why Asus used USB 2.0 at all. Perhaps its engineers ran out of room to rout the additional traces?
The I/O panel also includes DisplayPort and HDMI outputs, an M.2 Wi-Fi module on a custom riser, five analog audio jacks, and a digital optical audio output. The DisplayPort can push a 60Hz refresh at 4096x2304, but the HDMI only goes up to 2160p at 24Hz.

The ROG logo decorates a thick aluminum M.2 shield that hosts both PCIe x4 and SATA-based M.2 drives. A front panel USB 2.0 and a system fan header are beneath it, Front Panel audio is behind it, and two SATA 6 Gb/s ports are before it. The metal-shielded PCIe x16 slot farther beneath it features four metal reinforcement pins to prevent damage when moving around completed systems that have heavy graphics cards.
A USB 3.0 front-panel header, two SATA ports, a PC Speaker and front-panel switch/LED header, and the previously-mentioned addressable RGB LED connector are located along the front edge beneath the 24-pin primary power jack. Above that jack, four status LEDs indicate initialization of the boot device, graphics device, DRAM, and CPU.
Two more fan headers are found on either side of the “STRIX”-branded rear voltage regulator heat sink, and the front-panel USB 3.1 header is shoved into the upper rear corner. If you’re worried about CPU cooler clearance, the top heat sink projects 27mm above the motherboard’s surface, which is approximately 20mm above the CPU, and the rear sink stands 10mm higher.

The bottom of the Strix Z370-I Gaming features 12 RGB LEDs (along the front edge) and a second M.2 slot that supports only PCIe drives. Both the top and bottom slots support 80mm and 60mm M.2 lengths, and Asus includes a pair of adapters to secure 42mm drives.

The M.2 standoffs, screws, and 60mm-to-42mm adapters are individually wrapped, along with a “tool” that helps butterfingered installers put in the CPU without dropping it edgewise on the LGA contacts. The Strix Z370-I Gaming also includes driver disc, a full manual, an I/O shield, an Addressable LED extension cable, a bundle of cable ties, four medium-length SATA cables (two with a right-angled end), a Wi-Fi antenna, a front-panel lead bundler, a coupon code for a cable mod site, and a sheet of ROG stickers.

Asus was one of the first companies to adopt Intel’s 9-Pin front panel LED/switch connector back when everyone’s cases still had three-pin power LED connections. Builders complained. Asus reverted to its legacy connector at the same time as case manufacturers switched to split Power LED connectors that would support both 3-Pin and 2-Pin spacing. Soon other motherboard brands began using the Intel 9-Pin pattern, leaving Asus the odd brand out. And now that all the popular brands have the same 9-Pin front-panel connection, it’s probably a good time for case manufacturers to follow suit. Since that hasn’t happened yet, Asus came up with this handy cable bundler.
MORE: Best Motherboards
MORE: How To Choose A Motherboard
MORE: All Motherboard Content
