Step 5: Configure The Stereoscopic Driver For Use And Test Operation
The hardware setup is now complete! Let's set up the glasses and test them. Because we're using the Nvidia driver, we go to the Nvidia driver advanced classic control panel and see a new category: Stereo Properties.
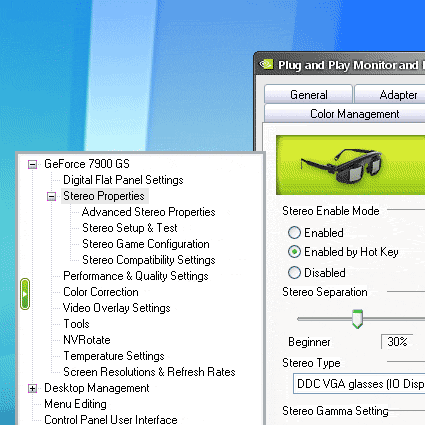
Click the Stereo properties category and you will see some options. Under "Stereo Enabled Mode", select 'Enabled by Hot Key". This will allow us to turn stereoscopic mode on or off within a game. Below this setting is the "Stereo Separation" section. I find it works best when the slider is decreased to 10% from the default 30% - at 30%, I find the separation is so great that my eyes can't reconcile things close-up in the scene, like the gun your avatar holds in first person shooters, or the interface in some titles.
Now click the "Advanced Stereo Properties" category in the Control Panel. You will see that the default way to turn stereoscopic mode on or off is by holding down the Ctrl key and pressing the "T" key at the same time. You will also see that Ctrl-F3 will decrease the separation in game, and Ctrl-F4 will increase separation. Also, Ctrl-G will increase gamma, and Alt-G will decrease it. These controls are important for tailoring your in-game experience, so keep them in mind.
Now we're all set up, so let's try a test. Click the "Stereo Setup and Test" category in the driver. Here you can force refresh rates for specific resolutions. Set the resolution slider to 1024x768 and the refresh rate to the highest your projector will handle, in our case 85 Hz. Save the setting and launch the test application. Have your stereoscopic glasses on, of course!
The system should now display a stereoscopic demo. Don't be alarmed if all you see through the wireless glasses is what appears to be a double-blurred image: you have to let the glasses know it's time to turn on. There is a small button on the glasses behind the bridge of the nose and to the left. You can press it while wearing the glasses to activate them, turning them on and telling them to seek a signal from the transmitter.
Suddenly, if everything is set up correctly, you will see what appears to be an Nvidia logo twirling just inches from your face. Congratulations! Your stereo 3D setup works, and you're ready for some incredible 3D wall-sized gaming!